Hello, World Tutorial
The purpose of this tutorial is to get you started with the general workflow of making a game in GTGameEngine. This is not a complete game, but instead just an introduction to the very basics.
All we'll be doing in this tutorial is placing a box into a scene that the player will move around with the arrow keys. We'll cover the following:
- Creating a scene
- Creating scene nodes
- Attaching scripts to scene nodes
- Setting up the game camera
- Setting up the game's startup scene
(This tutorial uses animated GIFs to illustrate a few things. Sometimes the browser might decide to stop playing them - I apologise in advance if this happens to you.)
1. Download the Sandbox
We're going to be using the sandbox for this tutorial, so if you haven't yet done so, download a copy. Remember, the sandbox is your game, so rename the directory to something appropriate.
2. Open the Editor
The editor is built into the game. To access it, simply open the sandbox. When you first start it up, you'll be greeted with it's introduction screen. Later we'll be changing the startup scene, but for now just go straight into the editor.
When you enter the editor, you'll be greeted with a simple text file explaining a few things. Hopefully this tutorial is written well enough that you can just close that file.
3. Create a New Scene
To create a scene, just right click on the directory you want it placed in (through the asset explorer on the left) and select the "New Scene" button. You may want to place this in it's own directory, which is created in the same way.
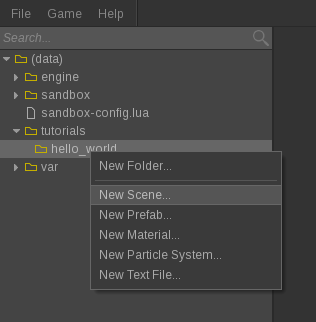
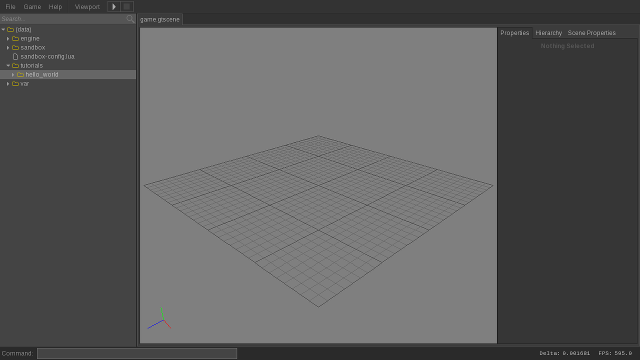
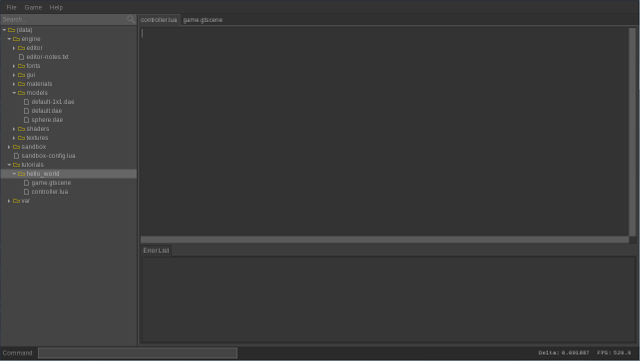
You'll be asked for a file name. We'll just call it "game", but you can name it whatever you like. Don't include the extension. The new scene will be opened automatically which will present you with an empty scene like the one below.
4. Create a Scene Node
The content of a scene is made up of scene nodes. We'll add a scene node that simply shows a model. There are multiple ways to do this, but the easiest way is to simply drag-and-drop from the asset explorer. We'll add the engine's default cube model, but feel free to use whatever you like:
When a scene node is added, it is placed a number units in front of the camera. It will appear that the model is placed in the middle, but it actually isn't. Move the scene node to the origin by selecting the node if it isn't already (left-click without moving the camera) and then set the position in the "Transform" pannel on the properties panel on the right.
You'll notice that the new model is completely black. That's because there are no lights in the scene yet. We won't be covering lighting here, but it's super easy to add them - just right click in the viewport and add them via the context menu. (There is currently no unlit, texture-only view. Sorry!)
5. Create a Script
We will make it so the box moves with the arrow keys. To do this, we need to create a script and attach it to the box using a Script component.
Create a script file called "controller.lua" in the same way as you created the scene, only this time create it as a text file and include the extension. The file will open automatically after creating it:
Copy this script over to your new script file:
--[[public:number]] self.MoveSpeed = 5.0;

function self:OnUpdate(deltaTimeInSeconds)
    local newPosition = self:GetPosition();

    if Game.IsKeyDown(GTEngine.Keys.ArrowUp) then
        newPosition.z = newPosition.z - self.MoveSpeed * deltaTimeInSeconds;
    end

    if Game.IsKeyDown(GTEngine.Keys.ArrowDown) then
        newPosition.z = newPosition.z + self.MoveSpeed * deltaTimeInSeconds;
    end

    if Game.IsKeyDown(GTEngine.Keys.ArrowLeft) then
        newPosition.x = newPosition.x - self.MoveSpeed * deltaTimeInSeconds;
    end

    if Game.IsKeyDown(GTEngine.Keys.ArrowRight) then
        newPosition.x = newPosition.x + self.MoveSpeed * deltaTimeInSeconds;
    end

    self:SetPosition(newPosition);
end
There are a few things of note here. First of all, you need to think of the script in the context of it being attached to a scene node. The "self" keyword is the scene node the script is attached to. When you declare a member variable, it needs to be declared in "self". If you declare it globally, it will be made public to the entire game script. Always declare you member variables inside "self".
You'll notice that the very first line has a special block comment in front of it. This is how the engine knows to make the variable available for modification from inside the scene editor. It's a hacky system, but it allows the engine to use standard Lua without modification which keeps the engine simpler.
Scripts are executed in response to events posted by the engine. The above script handles only one event which is the OnUpdate event. This is posted every frame when the scene node needs to be updated. What we're doing in this event is simply checking which arrow keys are down and changing the position of the scene node appropriately.
6. Attach the Script
With the script created, we now need to attach it to a scene node. We are, of course, going to attach it to the box we added earlier. To do this, we need attach a Script component. Do this by selecting the box and hitting the New Component button in the properties panel and selecting Script.
Once the Script component has been attached, we just drag-and-drop our script file like so:
You can attach multiple script files to a single scene node.
You'll notice that we can modify the "MoveSpeed" variable from inside the editor. It's value can be changed at any time, and is unique to each individual scene node the script is attached to.
7. Test the Script
We can now test the script (spoiler: it works) by hitting the "Play" button located in the toolbar along the top. This will start playing the scene from inside the editor. Simply hit the arrow keys and watch the box move around.
You can stop playing the scene by hitting the "Stop" button or CTRL+Break. You can also pause by hitting the "Pause" button or the Break key.
If you have a runtime error in the script it will be posted to the console window. The error will not be shown inside the editor. This is a known limitation and will hopefully be addressed in the near future.
8. Create a Camera
You'll notice that when we played the game, it used the editor's viewport camera. When we play the game for real from outside the editor, what camera does it use? Well, we need to create one and let the scene know that that is the one to use.
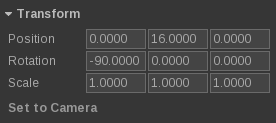
A camera is just a scene node with a Camera component attached. To create a camera, simply right-click in the viewport and hit "Add Camera". This will position the new scene node just in front of the viewport camera. You can position the camera however you like, but in this tutorial we'll place it just above origin, pointing downwards. Below is a screenshot of the camera's transform for you to copy:
So how do we let the scene know that this is the camera to use? We create a script. The script will handle the OnStartup event which will simply set the current camera to whatever scene node the script is attached to. We create and attach the script in exactly the same way as we did the first one, only this time we'll be attaching it to the camera scene node. This is the script:
function self:OnStartup()
    self.Scene:SetViewportCamera(self);
end
Attach the script to the camera like normal and play the scene again. You'll notice that the new camera is used instead of the editor's viewport camera. As you might be able to imagine, this is essential for testing your game from inside the editor.
9. Set the Startup Scene
We now have the scene for our "game" done, so now we need to tell the game to use that scene as the startup scene. Doing this is super simple - you simply modify the "data/sandbox-config.lua" file.
Open "data/sandbox-config.lua" and change the "Game.StartupScene" property to your own scene. You'll notice that the default is the sandbox's intro scene - feel free to open that scene and check it out if you're curious.
After you've changed the config file restart the game and check that it's working. Instead of showing the sandbox intro, it should show your own scene. If you stuffed up and the game can't find the startup scene, it'll just go straight to the editor. In a real game, you'll want to have the startup scene set to your main menu.
10. Conclusion
You should now have a good enough idea on the general workflow for creating a scene. Obviously, not everything is covered in this tutorial, but the idea is to just introduce you to the absolute basics. Future tutorials will cover more things like setting up GUIs.